The IPXO Platform is an amazing platform that allows individuals and companies to easily lease and monetize their owned IP resources.
Use the information provided in this guide to learn how to monetize your IPs in the Platform.
Prerequisites
Before uploading the subnet to the IPXO Platform, you have to make sure that the subnet has the right status.
AFRINIC inetnum status
This table shows which statuses are acceptable if you want to add subnets to the IPXO Platform from AFRINIC.
| Inetnum Status | Action |
| Sub-Allocated PA | Authorize by adding IPXO-MNT as mnt-by |
| Allocated PA (mask = 24) | Unsupported |
| Allocated PA (mask < 24) | Create a more specific inetnum with Assigned PA status and add IPXO-MNT as mnt-by |
| Assigned PA | Authorize by adding IPXO-MNT as mnt-by |
| Legacy | Unsupported |
ARIN inetnum status
This table shows which statuses are acceptable if you want to add subnets to the IPXO Platform from ARIN.
| NetType | Action |
| Direct Allocation | Reallocate to IPXO LLC (OrgID: DCL-577) |
| Direct Assignment | Unsupported: To change your Direct Assignment to Direct Allocation, open a ticket and request the change of the status |
| Reassigned | Unsupported |
| Reallocated | Supported if reallocated to IPXO LLC (OrgID: DCL-577) |
| Legacy | Unsupported |
LACNIC inetnum status
This table shows which statuses are acceptable if you want to add subnets to the IPXO Platform from LACNIC.
| Inetnum Status | Action |
| Direct Allocation | Reallocate to IPXO Ltd. OrgID: BZ-IPLT2-LACNIC |
| Direct Allocation (=/24) | Unsupported |
| Allocated | Reallocate to IPXO Ltd. OrgID: BZ-IPLT2-LACNIC |
| Allocated (=/24) | Unsupported |
| Legacy Reallocated (=/24) Reallocated | Unsupported: Reallocate to IPXO Ltd. OrgID: BZ-IPLT2-LACNIC |
RIPE inetnum status
This table shows which statuses are acceptable if you want to add subnets to the IPXO Platform from RIPE.
| Inetnum Status | Action |
| Sub-Allocated PA | Authorize by adding netutils-mnt as mnt-by |
| Legacy | Unsupported |
| Allocated PA (mask = 24) | Authorize by adding netutils-mnt as mnt-lower, mnt-domains, mnt-routes |
| Assigned PA | Unsupported: Recreate the inetnum with a Sub-Allocated PA status |
| Allocated PA (mask < 24) | Create a more specific inetnum with Sub-Allocated PA status and add netutils-mnt as mnt-by |
| Assigned PI | Unsupported: Here is an official guide from RIPE on how to convert an Assigned PI to an Allocated PA |
Important! Before you proceed, make sure that your IP range is ready to be leased in the Platform. You can find more information about that in our How to Prepare Your Subnet for the IPXO Platform guide.
Step 1: Add the subnet via the IPXO Portal
Log in to the IPXO Portal and click Monetization (1) -> Add Subnets (2) in the menu on the left. Add your subnet(s) to the field (3) and click Add (4). Finally, click Next (5) to move to the following step.

Step 2: Set your subnet's details
In the following step, called Setup, select your subnet and click the Set Up icon on the right.

Choose the following settings and then click Next:
- The minimum and maximum split sizes of your subnet
- Set Reserve if you want your subnet to be hidden from the IPXO Platform
- If the subnet is from APNIC, you will be required to add MNT and the password

Click Next to move to the following step.

Step 3: Set your subnet's price
In the following step, called Pricing, select your subnet and click the Set Up icon.

Enter the desired price into the Subnet price per month field and click Save -> Next.
Note: The set monthly price does not include the additional IPXO commissions. The commission is listed in the Commissions column. The total price in the IPXO Platform is shown in the Platform price column.
You can learn more about earnings and payouts using our Earnings and Payouts in the IPXO Platform guide.
Click Next to move to the following step.
Step 4: Finalize the setup of your subnet(s)
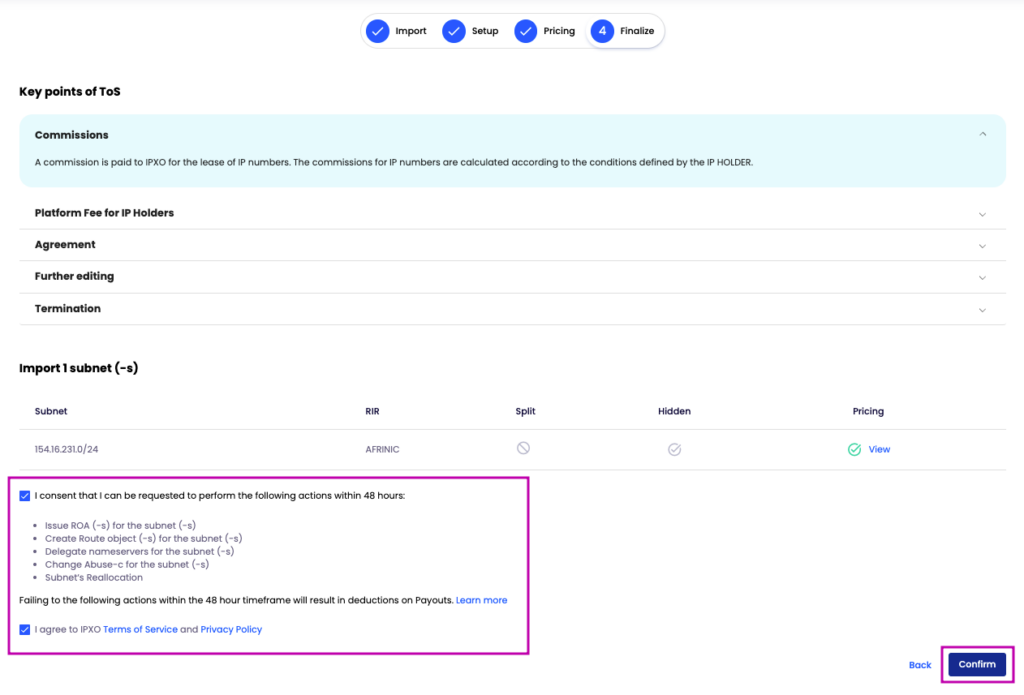
In the last step, called Finalize, check if the details are correct. Accept our Terms of Service and Privacy Policy agreements only after carefully reading them. Finally, click Confirm.

Once you submit your subnet, it will have the Pending authorization status. The subnet will be checked for validation once your IP range ownership is verified. The Customer Solutions team will contact you if any additional steps are missing.
Note: You can learn more about the Subnet Ownership Confirmation using our guide.
After accepting the Ownership verification email you will be able to see the subnet being processed through our system.
Ideally, there should be no ROAs or announcements on the subnet, however, if any issues occur you can click on the problematic subnet and investigate further.
Here is an example:


In this case, the subnet's reputation check failed, thus there are blocklist listings that need to be cleared out.
This is not the only possible issue when it comes to listing subnets on the platform, Stale ROA, BGP announcement, and inetnum objects can also cause this to be invalidated.
If you have any further questions, make sure to contact our Customer Solutions team via help.ipxo.com.
